Sharing video to the bench with Nacsport – Live review over a network
- Josh Bryan
- Feb 5, 2020
- 9 min read
Updated: Jul 5, 2022
This post is designed to give you a step by step guide for setting up a stable network, key for using both of the Nacsport tools, Real Time Streaming and Coach Station, which let you share video and data to enable live review on other devices during a live capture and analysis.
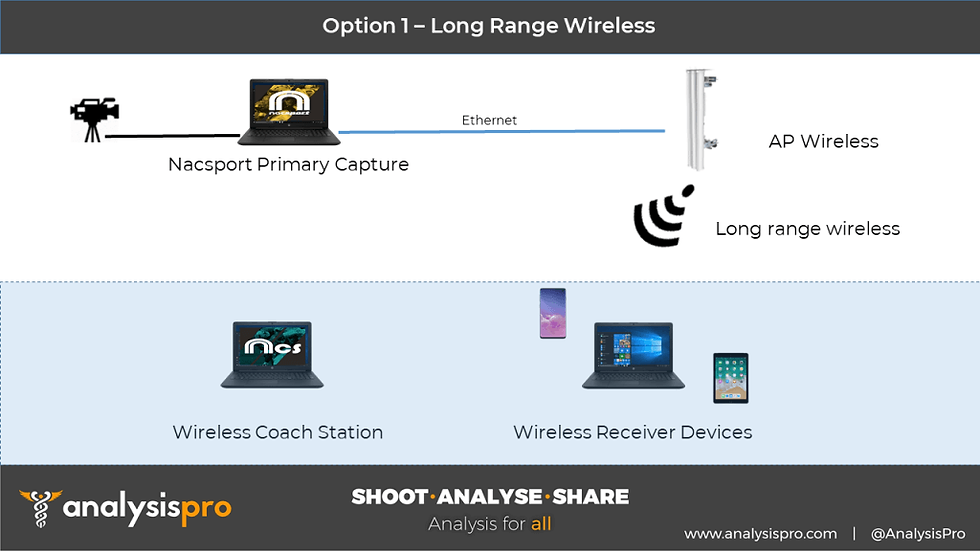
Network Setup
Before starting one of these processes in Nacsport, the most important part of your setup is to get your main Nacsport capture machine onto a network that will also be accessed by your receiver devices. This network needs to be stable and when using your own router or AP Wireless solution, we strongly recommend having your main capture machine connected to the router via an ethernet cable. For an even more solid connection, you should set a static IP range for your router, as we do when setting you up with AP Wireless.


For best practice and when using an Ethernet connection to your router, you should turn off the wireless on your computer before you start your live capture and streaming process. If you need the wireless connection for internet from a separate network for example, turn this back on and connect AFTER you have started your capture and live review streaming.
For your receiver devices, connect to the same network as the router. The strongest connection is again via ethernet cable; if you are next to the main machine for example. If your review devices are further away, you should connect them via the wireless connection to the router or if using AP Wireless, to the AP Wireless boosted network.


We will firstly look at the real time streaming process, which is available from Nacsport Basic Plus for sharing a live Dashboard, with Scout Plus also sharing registered clips live, then Pro Plus and Elite also enabling you to share drawings over your live video out to wireless devices too.
Nacsport Real Time Streaming

Start your capture in Nacsport and ensure that your capture profile is setup to stream out the video and data (see above). Once running, there are two ways to start your real time streaming process. If you are going to be streaming a live Dashboard, the best way is to first open your Dashboard, then at the top of the Dashboard window, you will see the antenna symbol, which is your real time streaming tool. Alternatively, you can press the same button on your register control window.

Press that button, then select ‘yes’ in the popup window. This window just removes any old content from the data stream, so your receivers will only see data from this new capture. Your Dashboard will now start streaming, along with registered clips and drawings if you are on a version that can use those.
When the process is running, you will see a small black window called Web Server appear on your screen. This displays the IP address at the bottom of the window, which is what your receiver devices need to type into their web browser to open the stream.

You have some settings that you can change for the stream, like how often the live Dashboard is refreshed for the receiver device and the interval you want for Dashboard history, which lets you see the Dashboard results from the previous 5-minute intervals for example. You can also determine more specifics for the stream, run some automated processes and choose how often the receiver device will refresh the content it gets.
If you started the streaming process with 2 networks in use on your machine, like Ethernet connection and Wireless, you will see a message in red text saying ‘Various IPs’. Click this and you will see your two network adapters, usually the Ethernet and the Wireless. Choose the one that you are connected to your network with. As mentioned at the start, we recommend an Ethernet connection to your router and turning off WiFi if you don’t need it.


If your receiver devices are connected to the same network, all they need to do is open a web browser then type in the IP address that is shown in the Web Server window we just mentioned to start their live review. Depending on the version of your main capture machine sending the stream, the receiver will then be able to switch between viewing the live dashboard, a history of previous dashboards, the play by play window that enables them to download clips to view, their device playlist and in game drawings.

In your template settings, you can determine whether you want category clips to be added into the web server play by play or not. You find this option in the behaviour setting for each category button; by default, it is turned on so everything streams.

For the receivers, their Play by Play list of clips will keep updating as you register new clips. They just need to choose to download a clip, then your capture machine will create this clip and stream out. Once it is ready, it will show a play icon.
If you have multiple receiver devices on the same network, they will all be able to live review and play clips as soon as one device requests it. The star button lets receivers add clips into their own device playlist, so they can keep going back to their favourite clips whilst connected to the stream. Yellow stars show that a clip is added to the playlist on the receiver’s own device and blue stars show that the clip has been added to a playlist on a different receiver’s device.

If using Nacsport Elite, in the web server settings on the machine there was a tick box option to ‘make presentation with the remote lists’. This means that if your receivers are playlisting clips on their devices, when you stop the capture on the main machine and go to the timeline, you will be able to open a presentation window that was automatically created in the ‘Real_Time_Pres’ folder.
This will contain lists for the different receiver devices and show the clips they playlisted during the live capture and stream. A great process for speeding up your feedback after the capture, as you can show the receivers the moments they highlighted during the live event.

If using Nacsport Pro Plus and Elite, you have the option to send in game drawings. When watching back a registered clip or scrubbing back to a previous moment in the video, you can open the drawing tool, add your drawings over the still frame then press the option to send to in game drawings. Receiver devices will then be able to see these drawings, with the most recent always at the top.
Nacsport Coach Station
Now let’s look at sending out video and data to a Coach Station machine from either your Pro Plus or Elite licence, a further enhanced live review process. Your network setup protocol is the same as before, so we recommend an Ethernet connection to your router from the main capture machine, ensuring that you turn off your WiFi before you start the capture.
When you go to start a capture in Pro Plus or Elite, you will need to ensure that you have created a capture profile that can be used for streaming out your video and data.

‘Stream Video Signal’ needs to be selected for you to be able to stream the live video you are capturing out to your Coach Station machines.
In Elite, you also see ‘Send Data to Coach Station’, which needs to be turned on if you want the Coach Station to be able to use a live play by play table, matrix and interactive Dashboard.
‘Playback while capturing’ enables you to scrub back through the live video on your capture machine.
With everything set up, you are now ready to start your capture. Once the capture is running, you will see a small antenna button towards the top left of your capture window.
Hover your mouse over it or click it to display the address that you are streaming out the video and data on, which begins with mmsh://

On your Coach Station machine, ensure that you are connected to the same network as mentioned before, then open Nacsport and press Tools then Coach Station from the main menu. Here you have a window to type in your streaming addresses.
If both the video and data is coming from the capturing Nacsport machine, you need to select the ‘Main computer streaming address’ box and then type in just the IP address shown in the capture window on the main machine. For example, 192.168.0.31 would be the number to type in if looking at the above capture window.

If the network you are using also has a separate video feed (like an IP camera or RTSP feeds), you can enter the address of this by ticking ‘Use alternative video stream’ and then typing the feed address into the ‘Alternative video feed’ box (and adding a user name and password if needed). If that was your case, you would change your capture profile on the main machine to still ‘Send Data to Coach Station’ but NOT ‘Stream Video Signal’, as that would be a waste of CPU resources.

You can press ‘Test video stream’ to check if the feed is coming through. Next to the ‘Test video stream’ button, there is a settings cog. Here you can change the video render settings for your Coach Station machine from Video Render 7 to Video Render 9 or Video Render EVR. If your feed looks jumpy, you can try these different render settings. When you are ready and the settings are applied, press ‘Start Capture’.


The Coach Station will have access to the video and data from the moment that you press Start Capture, so make sure to start your capture on the main machine, then this capture on your Coach Station before the event starts, as you can only review what has been received from that point onwards.
After 20 seconds of running, the Coach Station device will be able to press the delayed feed button to open a second video window. The live window will go small and then you can use the delay window to scrub back through the video with all the usual Nacsport playback controls.

Once the play head on your delay window gets towards the end, it will automatically refresh to bring in more video from the live stream. This delay window will always be behind time, so if you notice that it is not refreshing when it is at the end, it is just because the new video isn’t available yet.
You can press the small buttons along the bottom to manually refresh the delay window’s total video available, or stay within a certain amount of delay time on the live video (-5, -10, -15). Each time your delay window refreshes to bring more video in, it takes about half a second, so over time your delay will get longer than the amount you have selected. In that case, just press the option you want again to get as near as possible.

If the main capture machine is Nacsport Elite and streaming the data, the Coach Station can choose to open the Play by Play window, Matrix and Dashboard too.

With your delayed video window open, when you press the play icon on registers in the Play by Play window, the video will jump to that moment. You can filter this window by specific categories to help with review, for example only seeing Coach or team specific clips that are registered.

If using a Dashboard on the Coach Station, you need to ensure that it has been created alongside the template being used on the main capture machine, so it can display the data it is receiving. You will likely have created the Dashboard on the main capture machine with your template, so you just need to export the Dashboard, then import it into the Dashboard menu on the Nacsport machine that is running Coach Station.

During the event, clicking on Dashboard results in Coach Station will make the corresponding moment from the video pop up, so this is a really interactive way to bring stats to life for live review.
Remember…
As mentioned at the very start, the most important part of this process is getting your network setup right to begin with. Try to have an ethernet connection from your main capture machine to your router and have your WiFi turned off, then connect your receiver or Coach Station devices to the router via ethernet if close enough, or connect via WiFi to the router or AP Wireless booster network. Once everything is set and ready to go, you can make the most out of using the live streaming and review processes available with Nacsport!
We previously created a video running through these processes, so you can bookmark and review that too! If you need any assistance or have any questions, please just contact us on support@analysispro.com
To see some examples of these live sharing processes in action, check out these following links:

Darren Lewis, Head of Analysis at Gloucester Rugby, shares the processes and impact of performance analysis and live review at the club

Franck Azema (ASM Clermont Auvergne Director of Rugby) uses Nacsport Coach Station to live review footage and performance analysis in the game

Live performance analysis and live review using Nacsport at Sheffield Steelers Ice Hockey team

Comments