Live capture with Nacsport – Setting your capture profiles
- Josh Bryan
- Jan 11, 2021
- 9 min read
Updated: Jul 2, 2022
All versions of Nacsport enable you to capture live video footage into your video analysis software, which is a great workflow for performance analysis, as you can speed up the process of delivering high quality video feedback to your team to enhance understanding and performance, both during a live game/training and for post event analysis.
In this blog, I will explain how you can edit and set up your own capture profiles in Nacsport, helping you to get the best quality video capture into your computer and workflows. The reason for creating different profiles is because there are lots of different environments that you can use live capture in, at games or training sessions for examples. Furthermore, you may have a variety of video sources and equipment, along with different processes you may need to use in different environments, like sharing video and data to the bench and enabling video review during the live capture.
Nacsport comes with a default capture profile, but you are able to create and edit additional profiles to get the best setup for your computer, capture device and camera hardware.
Below, I will run through each setting in the capture profile to explain the importance of each one and some options for you to try. I can’t give a ‘perfect profile’, as we open the door for adapting your profile based on the different hardware that you can use with Nacsport for your live capture. Of course, if you need further assistance with this, you can contact us on support@analysispro.com and we can help you with your capture profiles if needed.
Note: Some of the settings below are only visible in the higher versions of Nacsport, so you may not be able to use or edit those in your version of Nacsport.
Getting started
When you have a compatible capture device, you can take the SDI/HDMI feed from a camera and capture it into your Nacsport computer. From Basic Plus, you can also capture the feed from an IP Camera and internet sources like YouTube.
To start a live capture, you need to open Nacsport and click Real-Time Register from the main menu. You will be prompted to choose a name and location to save your captured MP4 file to. Your registering environment will then open with the last capture profile and device you used, along with your template, register control window and play by play window (if you set it to open automatically).
Select the ‘Devices’ option to choose a capture device that you have available on the machine, or select ‘IP Video Stream’ if you are using an IP Camera, RTSP feed or YouTube capture.
Selecting a Nacsport live capture profile
At this point, you will see the current capture profile and it’s settings displaying over your live video feed. If you don’t see the live video feed coming through, you may need to change your capture device selection and/or select a different capture profile.
If the live video feed is jumping, check that your CPU percentage isn’t overloading (check this with the Task Manager). If it is, you will need to try a different capture profile with a lower resolution that your machine can handle. If the CPU isn’t overloading and the video is still jumping, you should try different capture profiles using different render options. These are all things I will jump into more detail about shortly, but don’t forget that you can always contact support@analysispro.com so the team and I can work out suitable profiles for you too!
To select, edit or create new capture profiles, you can go to the capture profiles tab or click the profile in the top right corner of the video player window. Selecting a different profile to use is easy to do. Just click to select a profile if you are using the capture profile tab or select a profile and press the tick if you have the capture profile window open.

For now, I will show you how to create new profiles and edit those too. To do that, click the ‘Edit profiles’ option.
Nacsport live capture profile options
In this section, I will explain each of the options available to you in the capture profiles creation/editing window. Depending on the workflows you want to achieve and your machine’s capabilities, you should edit and use these different options to suit your requirements. Of course, feel free to contact support@analysispro.com to discuss your requirements and we can assist you further.
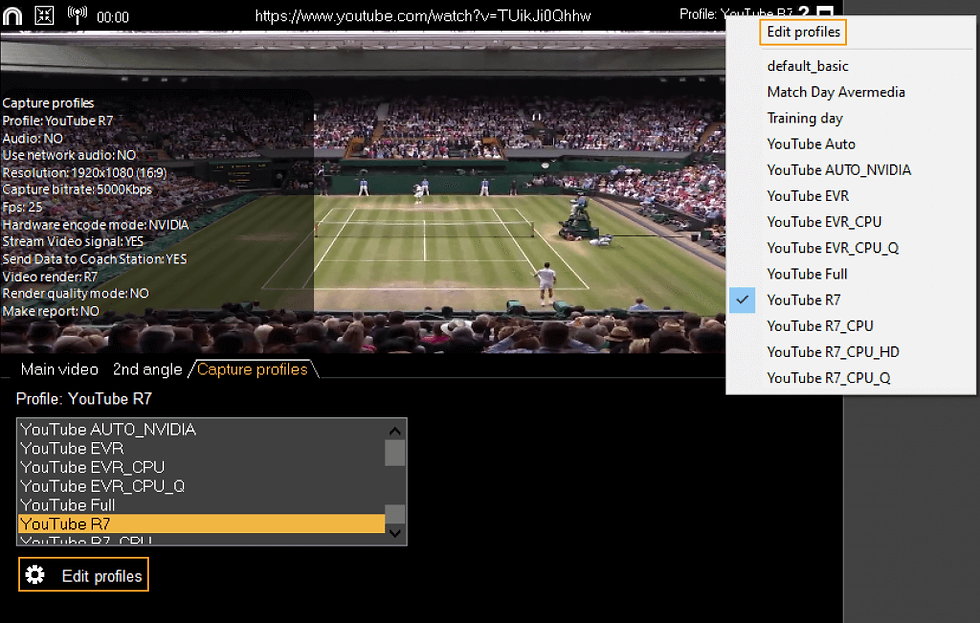
To create new profiles and edit existing profiles, you need to click the ‘Edit profiles’ option.
Create, duplicate, delete, export and import

If you look to the bottom left of this editing window, you will see some self-explanatory buttons to get started. Press the plus button to create a new profile to start editing, or select an existing profile to duplicate then edit. Next, you can delete an existing profile, then finally you can export and import profiles, which is really useful when sharing to other analysts in your team for example.
Name
Set the name for the profile (you cannot have 2 profiles with the same name).
Capture with audio
This option must be enabled to capture audio. With this option on, you can enable audio capture then select any audio device that is listed in the live capture window. If the audio is not important for your scenario, then it’s better to not use capture audio as it will reduce the compression process and CPU load.

Use network audio
This option is only for capturing audio when it comes from an IP stream or if wanting to capture the YouTube audio (you can only use network audio when capture audio is also enabled).
Resolution
This is the video resolution for the output video file. If your computer doesn’t have enough processing power, you will need to reduce the resolution, as that will decrease the CPU/GPU (graphics card) usage. For most scenarios, 1280×720 is a good balance for video quality and file size. You can create different profiles with different resolutions to use depending on the scenario.
Capture bitrate
This is the amount of information that is being put into the captured video file every second. With the new FFmpeg improvements in Nacsport, you can get very good video quality with low bitrates. From 3000 Kbps to 6000 Kbps, you get good quality video and keep the file sizes easy to handle (we like 5000 Kbps). Most of the time, using high bitrates just gives larger file sizes without much difference in actual visible video quality.

We don’t recommend using more than 8000 Kbps in any scenario. Using high bitrates doesn’t have any effect on the performance or processor workload, it just effects the final quality and file size. As a reference, for 120 minutes at 1280×720 resolution and 3000 Kbps you should get a 2.4GB file with good quality.
FPS
Frames per second. 99% of the time it doesn’t make sense to change this value to more than 25 fps. It only makes sense to change this value for very specific scenarios like recording a biomechanical movement, where you may need to move to a very specific frame. For long term compatibility, we recommend keeping this value at 25fps.
Hardware encode mode

By default, this option is off. Nacsport will detect the available GPUs and will show them as an option. Using hardware encode will reduce the CPU load and perform a H264 compression “on the fly”. Not all GPUs are compatible, so we can’t guarantee that this will work for all users. We always recommend Nvidia video cards as they show the better results. If you turn this option on, you then just need to select an available GPU to try.
An important note here is to keep your GPU video drivers up to date. Next to the GPU name you will see a “?” small icon. Clicking there will open a search for that GPU model driver. Always check to download the very latest driver version that is available from the main site (Nvidia website for example).
Stream video signal
When this option is on (available in Pro Plus and Elite), it will stream the video from the capture machine to Nacsport Coach Station. This option will use more CPU, so you only need to use this in a scenario where you are using Coach Station. If you can get the video into Coach Station via another IP stream on the network, this option must be disabled. For any scenario where Coach Station is not involved, you should have a profile without this option enabled.

Send Data to Coach Station
This option is only possible in Nacsport Elite and enables the data from the capture machine to be sent to Coach Station. As above, it only makes sense to use this option when working with Coach Station.
Playback while capturing / web server play by play
This option will enable you to open the delayed video feed while doing a live capture and also share through the web server play by play method, if you are using Pro Plus or Elite.
If you are using Scout Plus, this option isn’t visible but you will instead see ‘Web server play by play’, which needs to be on to enable you to share registered video clips to devices on the same network with the play by play webserver option (read here for more information).

Advanced options
When you turn this on, you will see some more options that you can change to further edit your capture profile. Video render options are the first thing for you to change if your live video is jumping and your CPU isn’t overloaded.

Video render
As Nacsport works with any type of computer, some CPUs and graphics cards will work better with a specific video render. With a different render option, you should check the capture starts after changing a render setting. If it doesn’t start, try a different render setting. Once you have created a profile with the different options available above this section, I recommend duplicating it multiple times so you can have a version with the different render options selected. This will give you a quick way to check the best render profile for your equipment and requirements.

Render quality mode
This option will slightly increase the capture video quality, but it also uses more CPU. If your computer is powerful enough you can enable this option. In most scenarios it is not needed, as the quality is already good enough. As with above, you may want to duplicate your profiles with different render options to have a render quality mode on/off and work out what is best for you.
Make capture report
This is for support purposes. If you have any recurring issue with the capture, you can create a very detailed report when this option is turned on. Don’t use this option unless our team or the Nacsport team have told you to use it.
Starting a live capture in Nacsport
After you have selected your capture device and capture profile, you just need to press the red recording button in the register control window to start your capture.

When the live capture starts, you can tag events using your buttons template and if using Pro Plus or Elite, you can open your delayed video feed window.
If using Basic Plus, you can open a Dashboard and start streaming that out to the play by play webserver. If using Scout Plus, you can do the same but also have the registered video clips being shared (more info on the live sharing processes and how to use them here).
If your capture window is showing a jumpy window, your CPU level will be too high (check this with the Task Manager) or you have the wrong video render option. This is the perfect time to try some different capture profile settings to match up with your computer’s performance and the requirements you need. Again, if you need further assistance you can contact support@analysispro.com.
Ending a live capture
When you press the stop button in your register control window, you will be asked to confirm that you want to stop the live capture. After this, you will be asked if you want to reindex the video file.

This should only take a minute or two and applies some quick checks to the captured video file to make it perform to it’s best ability. If you are short on time, you can click NO, but I recommend always pressing YES.
However, if you pressed NO, you can always reindex the video file later. To do this, go back to the main menu in Nacsport then press Tools and Reindex video file (watch how here). Select your captured video file and you can then quickly run this process. This is a helpful tool to use for video files you may have downloaded or been sent by others too, as it can apply some quick checks and fixes to video files that may be having exporting issues (more advice and assistance here).
Final thoughts
I fully appreciate that all the above may sound overcomplicated, but the capture profile tools were created to give Nacsport users more control over their capture setups and workflows, as we know there are a variety of requirements and hardware being used all over the world. It goes without saying that if you are struggling with any of the above and need more assistance with your capture workflows, please contact support@analysispro.com so we can help you!
Related Content:


Comments